Most teams across IT organizations need access to virtual machines (VM), or Elastic Compute Cloud (EC2), for various developmental activities in the AWS ecosystem. Providing Secure Shell (SSH) access with well-defined security policies and roles is often a herculean task. Most organizations achieve it through Lightweight Directory Access Protocol (LDAP) group policies, and some use custom centralized login systems like bastion or write their own system. However, even with these approaches, two fundamental issues often arise.
Security Risks
With a username-password approach, users can access the server with their passwords for the first time, upload the SSH private key from the client, and make the access passwordless for future logins. Now the question is whether the SSH configuration of all the systems can be changed to disallow passwordless logins. This could possibly make remote automation on the servers more difficult.
With a passwordless approach, SSH private keys can be compromised and make way for malicious activities on the server. Extra time will be needed to focus on storing the SSH private keys securely.
Imagine if there’s no policy to clean up the SSH private keys on the server of the terminated employees. This could give them access to the server even after leaving the company. This will cost time while revoking access for employees who have left the organization.
Lack of User Logging and Auditing
There’s no default option available to keep track of user activities once they are on the server. A complex custom script must be written to achieve it.
Keeping in mind the above parameters and the simplicity of the login system, Ambee uses AWS Session Manager for EC2 access. This has turned out to be great so far.
In this article, a step-by-step guide will be provided on leveraging the AWS service, Session Manager, to provide access to the EC2s controlled by IAM policies.

What is Session Manager?
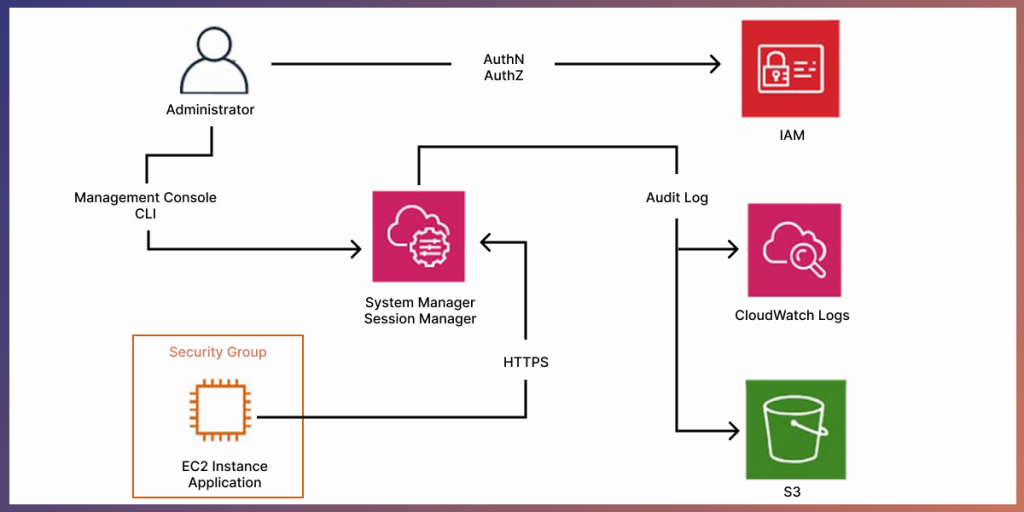
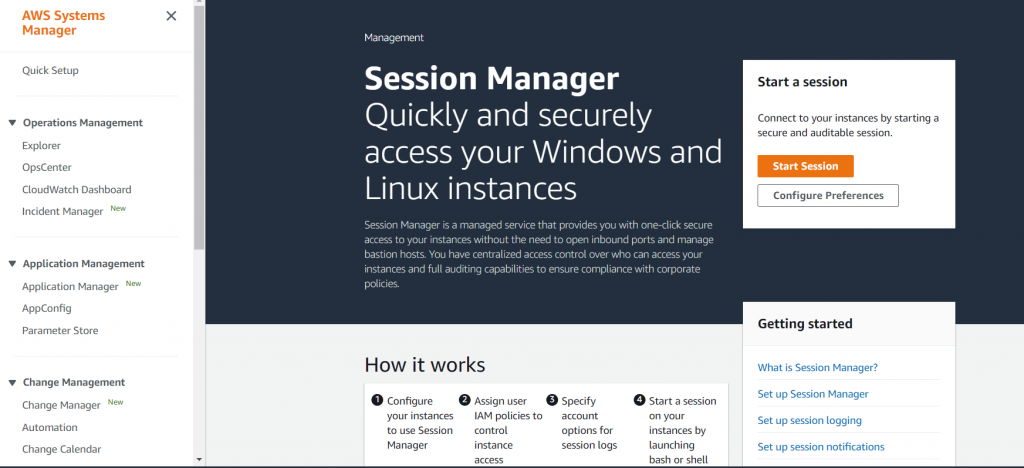
AWS Session Manager is a component of AWS System Manager that allows the management of instances through a browser-based shell or AWS Command Line Interface (CLI). It uses a lightweight agent installed on the servers to execute server management tasks accessible through the console. This can eliminate the requirement of bastion hosts, maintaining SSH keys, and minimize inbound ports/public IPs.
Find the benefits of using Session Manager here.
Before attempting to connect to EC2 with Session Manager, a few necessary setups must be followed as mentioned below:
- Create a custom instance profile role; Let’s refer to it as ‘DevOpsManagedSSMRole’ throughout this article, with the following policies attached:
- AmazonSSMManagedInstanceCore: AWS Managed policy.
- CloudWatchAgentServerPolicy: AWS Managed policy to allow the EC2 to push session logs to Cloudwatch. Create a log group in Cloudwatch in advance for EC2 session logging purposes.
- A custom policy that gives access to write session logs to the desired S3 bucket object.
Control the EC2 access for IAM users by using the below policy template:
{
  "Version": "2012-10-17",
  "Statement": [
    {
      "Effect": "Allow",
      "Action": [
        "ssm:StartSession"
      ],
      "Resource": [
        "arn:aws:ec2:<region_name>:<accont_id>:instance/<instance_id>",
        "arn:aws:ssm:<region_name>:<account_id>:document/SSM-SessionManagerRunShell"
      ]
    },
    {
      "Effect": "Allow",
      "Action": [
        "ssm:DescribeSessions",
        "ssm:GetConnectionStatus",
        "ssm:DescribeInstanceProperties",
        "ec2:DescribeInstances",
        "ssm:DescribeInstanceInformation"
      ],
      "Resource": "*"
    },
    {
      "Effect": "Allow",
      "Action": [
        "ssm:TerminateSession",
        "ssm:ResumeSession"
      ],
      "Resource": [
        "arn:aws:ssm:*:*:session/${aws:username}-*"
      ]
    }
  ]
}
Session Manager can also be used to connect to EC2 based on Instance Tags.
These are the bare minimum steps to connect to EC2 with Session Manager. Find the optional setups here – Setting up Session Manager – AWS Systems Manager.
Connecting to EC2 With Session Manager
1. Start by provisioning a new EC2 instance. Note that for Session Manager to work, SSM Agent needs to be installed on the EC2. Almost all the base Linux AMIs have this installed by default. Open the EC2 launch console.
- Select the 1st AMI and click next.

- Select the Instance type and click next.
- In the ‘Configure Instance Details’ step, make sure to select the IAM role ‘DevOpsManagedSSMRole’ created earlier and click Next.

- Add storage as per the requirements and click Next.
- Add Tags if needed or skip to the next step. Although, adding tags are always recommended since they are helpful.
- Make sure to remove the inbound rule for 22 port in the ‘Configure Security Group’ step as Session Manager doesn’t need this to be enabled to connect to EC2, thus providing an extra layer of security. Click review and launch.

2. Connecting to EC2 using Session Manager over the browser is possible through:
- Session manager console in the System Manager Service.

- Session Manager section from the EC2 dashboard

Let’s connect through the second option for simplicity.
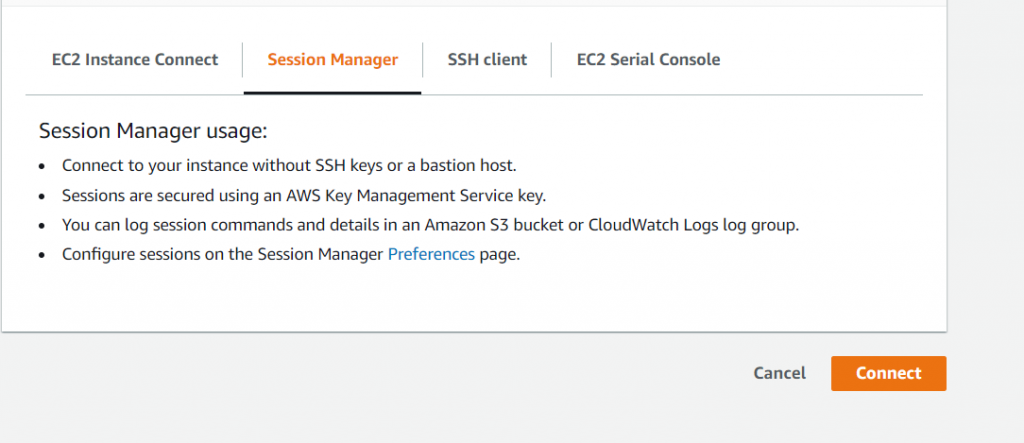
- Open EC2 dashboard, click on the newly launched EC2 instance, and click on Connect, which will open the landing page as shown in the image above.
- Click on Session Manager and then click Connect. This will take the user directly into the EC2 terminal with SSM-user, which is the user created by AWS for Session Manager operations. This can be changed by writing custom scripts in Session Manager Preference.
What about logging?
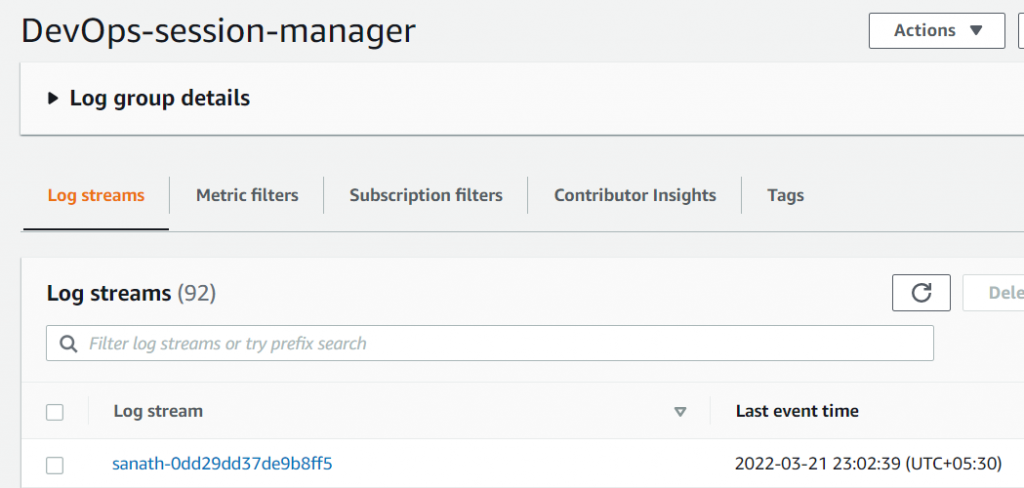
After signing out from the EC2 terminal, a screenshot of the terminal will be taken and pushed to Cloudwatch and S3 (the custom IAM policy created and attached with ‘DevOpsManagedSSMRole’). The audit logs will have ‘<iam_user>-<session_id>’ syntax.
Cloudwatch:

S3:

The log object in the S3 will have the screenshot from the EC2 session.

Connection to EC2 with Session Manager through AWS CLI can also be done. For that to work, Session Manager plugin will be needed to be installed on the client, follow the installation guide here. Once installed, run the below command to connect.
aws ssm start-session --target <ec2_instance_id>Find out how Ambee uses Amazon Web Services (AWS) Glue for extracting, transforming, and loading (ETL) data while processing big data.

Senior DevOps Engineer at Ambee. A passionate cloud engineer with good troubleshooting and automating skills.


