Many IoT applications
begin with a small number of connected devices and then grow over time to a
substantial number of devices. Therefore, it is important for organizations to
understand how their IoT infrastructure will scale to handle an increase in the
number of connected devices and the corresponding message throughput.
So, it is vital to
ensure that your IoT application can scale to handle any anticipated growth in
usage. That’s where MQTT
comes in.
What is MQTT ?
MQTT is the dominant
standard used in IoT communications. It allows assets/sensors to publish data,
for example, a weather sensor can publish the current temperature, wind
metrics, etc. MQTT also defines how consumers can receive that data.
In environments using
Low Power Wide Area Network (LPWAN) solutions, sensor data is sent over
wireless where it is received by one or more central base stations. These data
are small as individual packets but massive when aggregated together, is then
sent to analytics and visualization tools whether in the cloud or on-premises.
Residing on top of
the TCP/IP network stack, MQTT is a lightweight publish/subscribe messagingprotocol designed for
low-bandwidth, small size, low power usage, minimized data packets, high
latency, unreliable networks. MQTT’s features make it an excellent option for
sending high volumes of sensor messages to analytics platforms and cloud
solutions.
How does MQTT work ?
The core of the MQTT
protocol are clients and servers that send many-to-many communications between
multiple clients using the following:
Topics provide a way of categorizing the types
of message that may be sent. As one example, if a sensor measures temperature,
the topic might be defined as “TEMP” and the sensor sends messages labeled
“TEMP.”
Publishers include the sensors that are
configured to send out messages containing data. In the “TEMP” example, the
sensor would be considered the publisher.
In
addition to transmitting data, IoT devices can be configured as Subscribers that receive data
related to pre-defined topics. Devices can subscribe to multiple topics.
The broker is
the server at the center of it all, transmitting published messages to servers
or clients that have subscribed to specific topics.
Comparison between MQTT and HTTP protocols
Features
MQTT
HTTP
Architecture
It
has publish/subscribe architecture. Here devices can publish any topics and
can also subscribe for any topics for any updates.
It
has request/response means Client/Server architecture.
Upper layer protocol
It runs over TCP.
It runs over TCP and
UDP.
Message size
Small
Large
Message format
Binary with 2Byte
header
ASCII format.
Data security
Yes, It uses SSL/TLS
for security
No, hence HTTPS is
used to provide data security
Complexity
Simple
Client more complex
(ASCII parser)
Encryption
It encrypts payload
data are not encrypted
before transmission
Publish/Subscribe Model
MQTT clients are
split into two groups: A sender (referred to as a publisher in MQTT) and a
consumer that receives the data (an MQTT subscriber). The publisher and the
subscriber do not know anything about each other, and, in fact, are never in
direct contact with each other. A third component i.e. (MQTT broker) responsible for receiving all messages,
filtering the messages, determining who is subscribed to each message, and
sending the message to these subscribed clients.
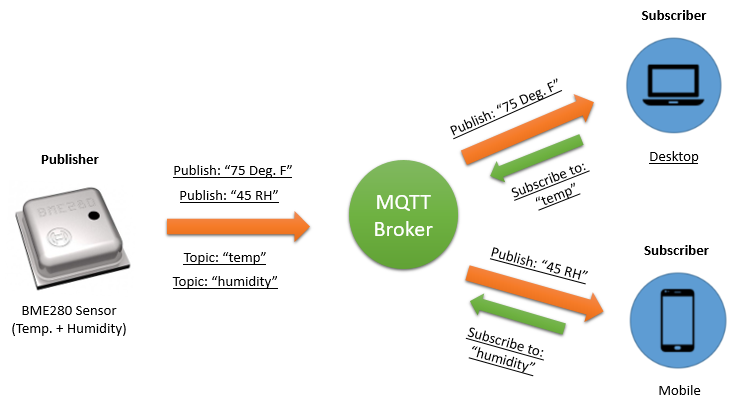
Example:
Let’s say there is a device that has a BME280 sensor. Certainly, it wants
to send his readings to the broker. On the other side, a phone/desktop
application wants to receive this temperature value. Therefore, 2 things will
happen:
The
device defines the topic it wants to publish on, ex: “temp” & “humidity”.
Then, it publishes the message “temperature value” & “humidity value”.
The
phone/desktop application subscribes to the topic “temp” & “humidity”.
Then, it receives the message that the device has published, which is the
temperature value or humidity value.
The broker role here is to take the message “temperature value” & “humidity value” and deliver it to phone/desktop application
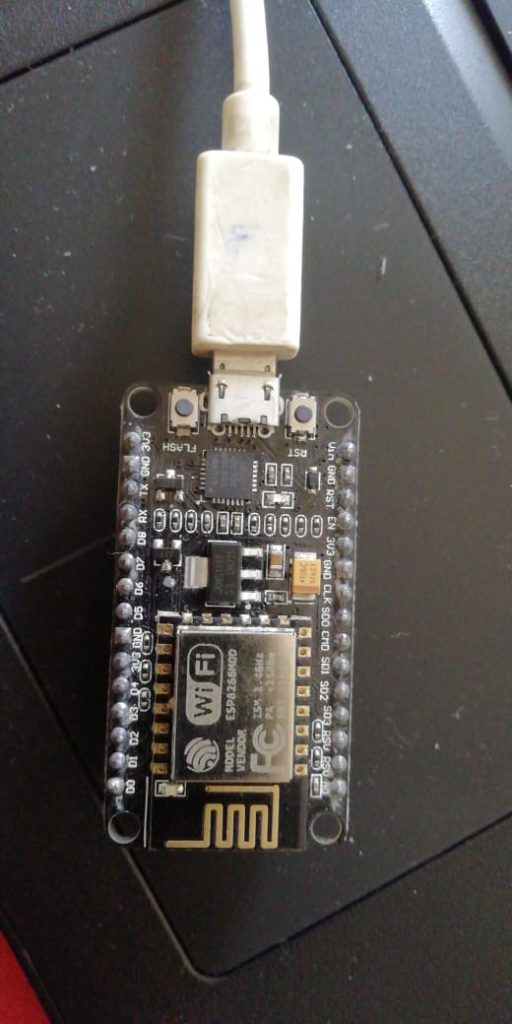
NodeMCU — MQTT Basic Example
This example will show the basic MQTT protocol usage on the NodeMCU board.We use the MQTTBox as the MQTT client here, and we will use the NodeMCU to complete following operations:
Publish
“hello world” to the topic “outTopic” every two seconds.
Subscribe
to the topic “inTopic”, print out any received messages.
It
assumes the received payloads are strings not binaries.
If
the subscribed message is “1”, light the onboards LED.Turn off the onboard LED
if the message to subscribe is “0”.
It will reconnect to the server if the connection is lost using a
blocking reconnect function. See the ‘mqtt_reconnect_nonblocking’ example
for how to achieve the same result without blocking the main loop.
Preparation:
NodeMCU x1
USB cable x1
Arduino IDE(Version latest)
Library
Installation
We need to install MQTT endpoint library(PubSubClient) to communicate with MQTT broker, please download the library from following link:
https://github.com/knolleary/pubsubclient
Unzip the above downloaded file, move the unzipped folder to Arduino IDE
library folder.
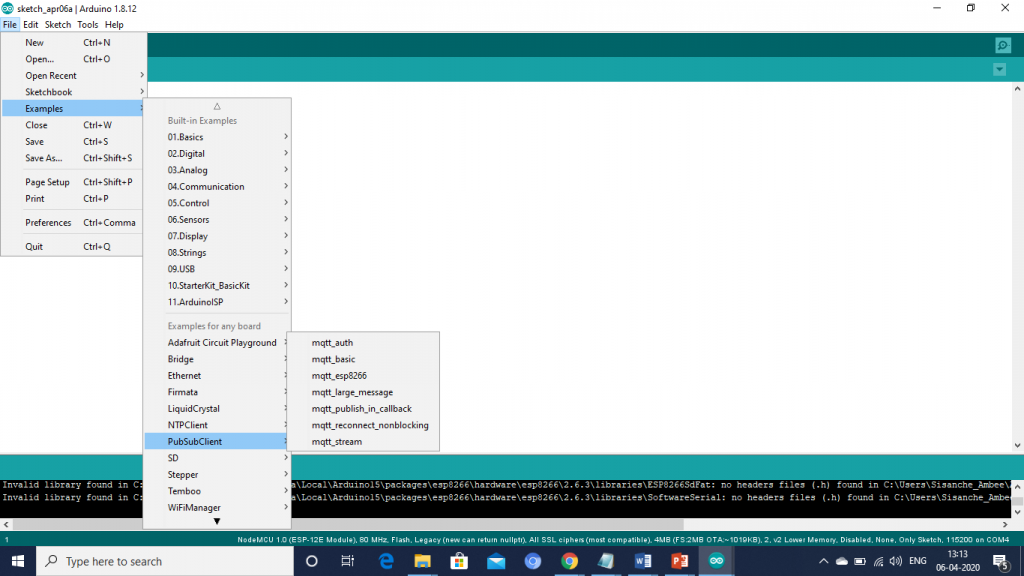
Open the Arduino IED,you can find the “pubsubclient” on the
“Examples” column:
MQTT
Client Installation:
We used the MQTTBox as the MQTT client.(You can also use another client)
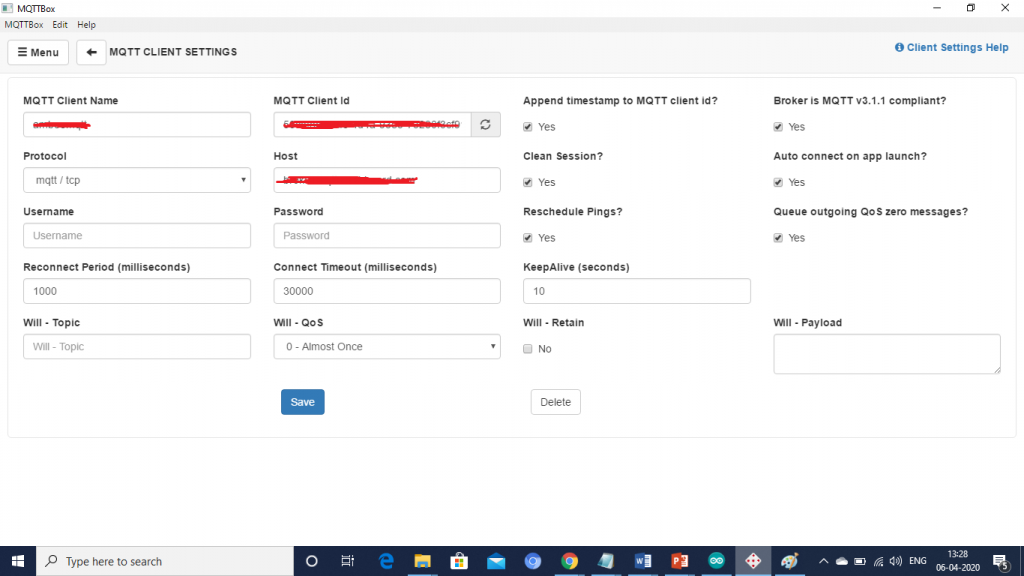
You will see this page after installation completed:
As you can see below, I have created one:
Go to Create MQTT Client & fill the details, according to your need, then click on SAVE.
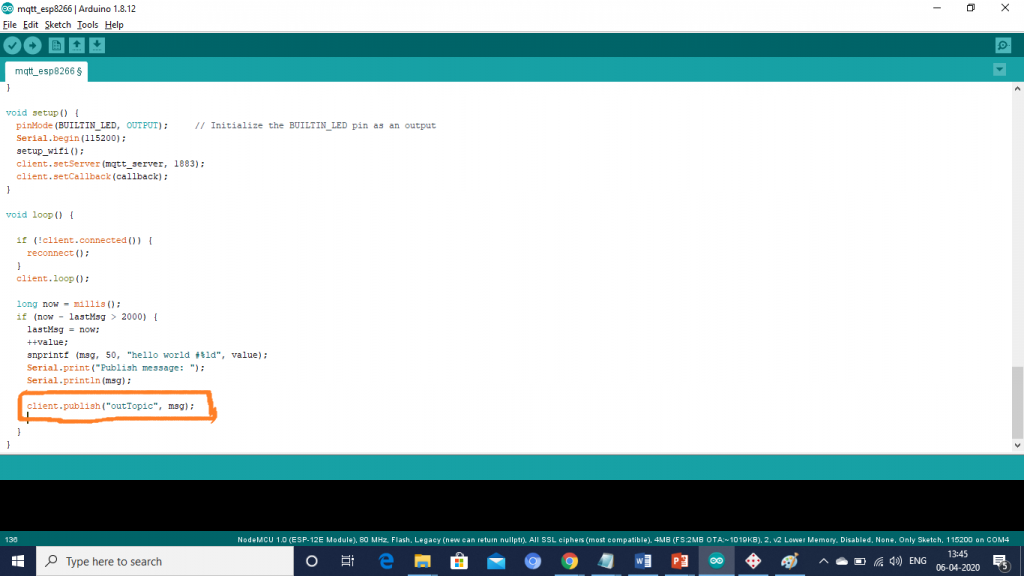
Upload sketch
For uploading, go with the below path:
Open Arduino IDE–>File–>Example–>pubsubclient–>mqtt esp8266
Edit the code to fit your own WiFi and MQTT
settings as following operations:
MQTT Server Address Setting
You can use your own MQTT broker URL or IP address to set above
mqtt_server value. You can also use some famous free MQTT server to test
the project.
const char* mqtt_server = “Your MQTT broker URL”;
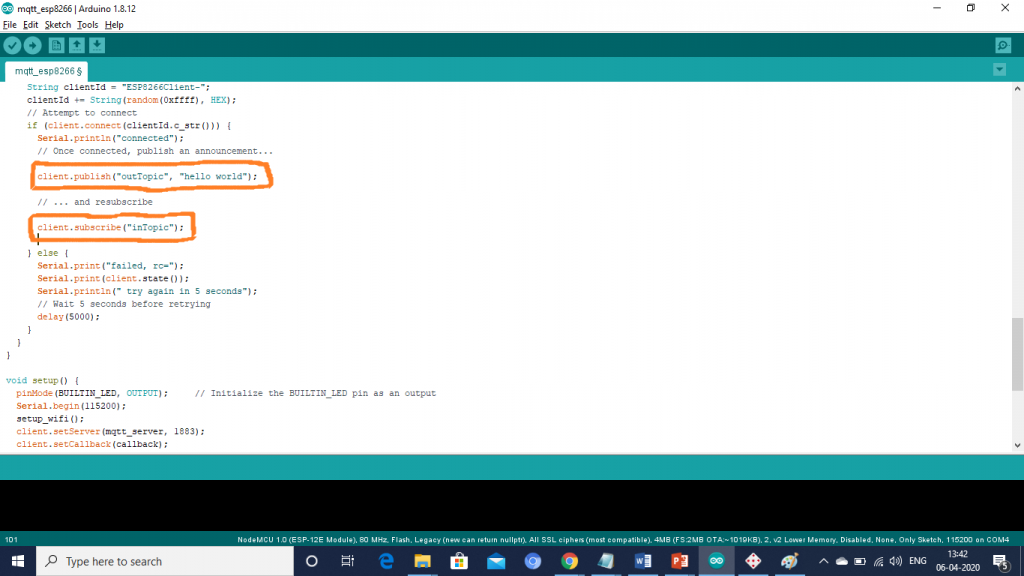
Topic setting:
Make sure your MQTT
client publish topic is same as your Arduino sketch subscribe topic(inTopic here).
Make sure your MQTT
client subscribe topic is same as your Arduino sketch publish topic(outTopic here).
As you can see on the Sketch side:
Program Running Result:
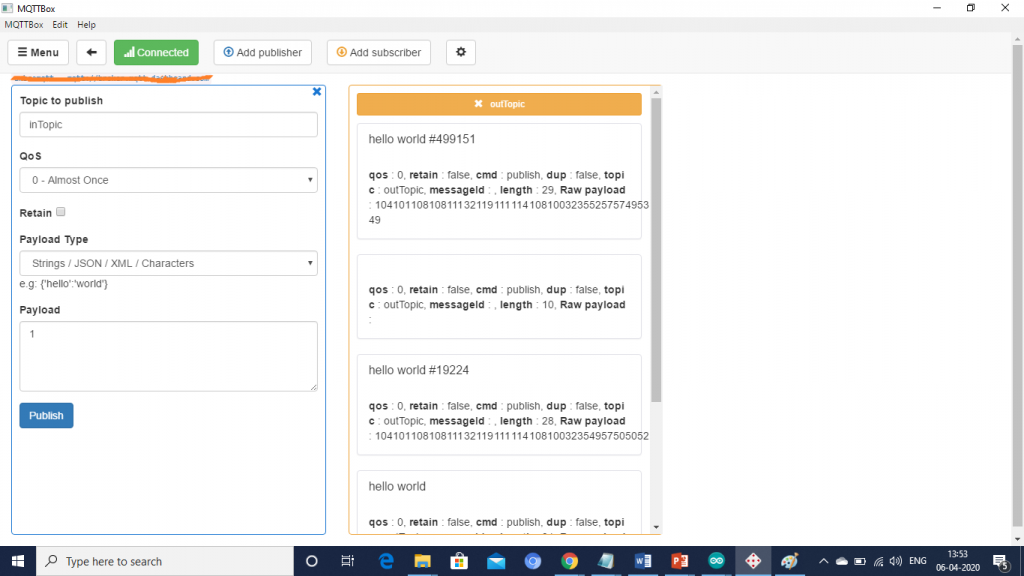
Once the upload done, if the wifi hotspot name and password setting is ok, and MQTT broker is connected, open the Serial Monitor,you will see following result:
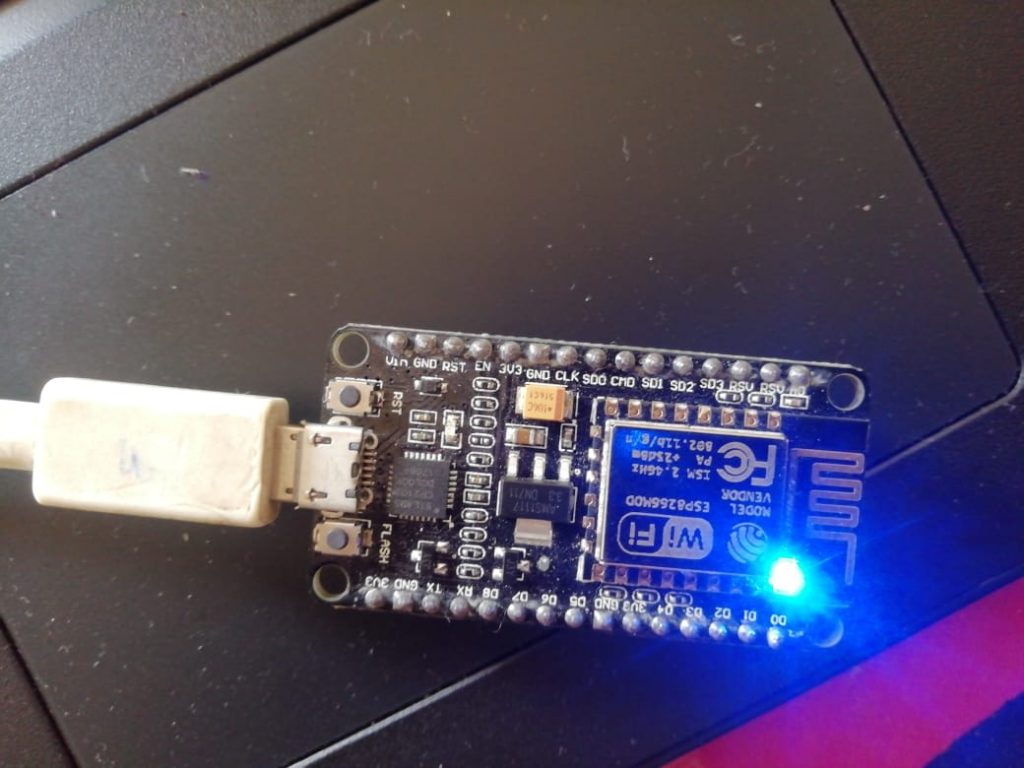
You can see the publish message “hello world” on the serial monitor. Then, open the MQTT client and publish payload “1” to the topic, this NodeMCU will recevie these messages by subscribing to the “inTopic”,and the LED will be light.
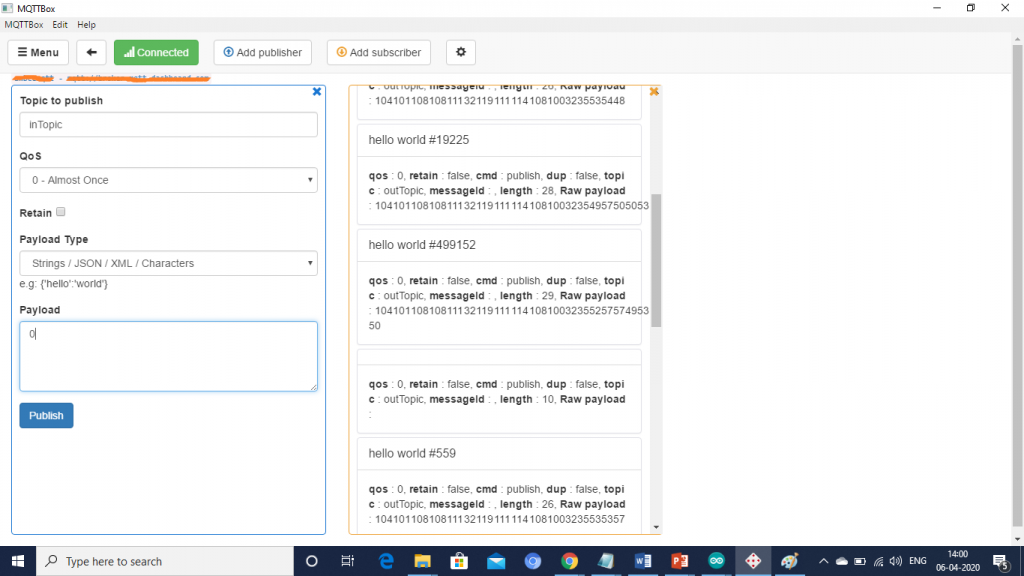
Publish payload “0” to this topic, the NodeMCU LED will be turned
off.
Video:
NodeMCU — MQTT Basic
Online Free MQTT Brokers for Testing
You can also do some online testing on some Brokers. However, not to publish anything sensitive. Topics are accessible by anyone.
Broker
Server
Ports
Websocket
Mosquitto
iot.eclipse.org
1883 / 8883
N/A
HiveMQ
broker.hivemq.com
1883
8000
Mosquitto
test.mosquitto.org
1883 / 8883 /
8884
8080 / 8081
HiveMQ
broker.mqttdashboard.com
1883
N/A
mosca
test.mosca.io
1883
80
Conclusion
MQTT provides a lots of functions for the Internet of Things. It can help providing a great performance and create new area for messaging and can handle billion of things connected through the internet. It is a very light weight protocol that can work with every types of devices and work using a minimum bandwidth. Now-a-days facebook.com is using MQTT protocol for their messenger which working great in our messaging in social network.
Most teams across IT organizations need access to virtual machines (VM), or Elastic Compute Cloud (EC2), for various developmental activities in the AWS ecosystem. Providing Secure Shell (SSH) access with well-defined security policies and roles Read more…
We at Ambee are always dealing with large chunks of data ( ~4TB / day ). Now that’s huge. You obviously can’t handle it using pandas ( or can you? ) Here is where the Read more…